How to clean shark vacuum filter – A Step by Step Instruction


Shark vacuum cleaners are a must-have in every home, thanks to their cleaning power. However, in order to keep them working efficiently, you also need to clean them once in a while.
And while the hose, attachments, and dust bins are the most common items washed and cleaned on a daily basis, cleaning your vacuum filter is also crucial for optimal performance and increasing the vacuum’s lifespan.
In this article, we will show you how to clean Shark vacuum filter properly. As you know, most people do not clean it the right way, leading to reduced lifespan and efficiency of the vacuum cleaner.
But first…
Read More:
- Master The Art Of How To Vacuum Mattresses And Pillows
- Master How To Vacuum Stairs Efficiently: Quick, Handy Guide!
- Can Robot Vacuums Be Hacked? Discover The Facts!
- Why Is My Robot Vacuum Beeping? Find Out Here!
- Easy Guide On How To Clean And Replace Vacuum Filters
How Often Should You Clean The Filter?
According to manufacturers, vacuum filters should be cleaned every 3 months. Meanwhile, the HEPA filter can run for 2 years without any issues. However, if you find the vacuum cleaner’s efficiency dropping, then you might want to clean or replace the filter sooner.
With that said, you will need to remember to clean and maintain your Shark vacuum filter 4 times every year for it to do its job well. Then again, even if you put it on your calendar reminder, you’d still probably miss a date or two. Read Here: Shark Vacuum Not Sucking – How To Fix It
Fortunately, there are some signs from your Shark vacuum that says it’s time for its filter to take a bath. These include:
- Unpleasant odor from the vacuum cleaner
- Reduced suction power
- Leaves dirt behind when cleaning
- The vacuum produces the gasp-like sounds
Also, take note that the manufacturer states that Shark vacuum cleaners never lose suction. So, if yours do, then you might want to check just how dirty its filter is.
How To Clean Shark Vacuum Filters?
Cleaning The Pre-Motor Filters
Remove the Filters
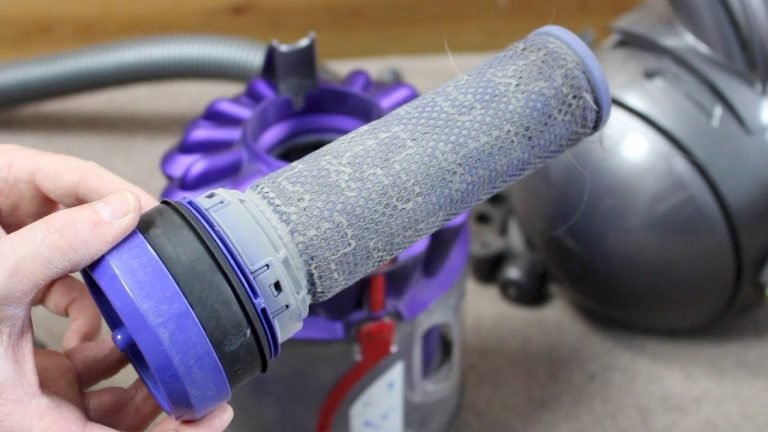
To start on how to clean Shark vacuum filter, you first need to remove the dirt canister. In most Shark vacuum cleaners, there are 2 pre-motor filters— one foam filter and one felt filter. These filters prevent dust and dirt from entering the vacuum’s motor.
Hand-washing Filters
After removing the filters, you can just hand-wash them under cool water tap until the water runs clear.
Some people like to wash these filters in soapy water in order to give them a thorough cleaning. You can do, but remember to wash both filters carefully, especially the filters made of felt as they are easy to get deformed or damaged.
Once cleaned and rinsed, the filters should be able to return to their white or near white appearance. Don’t worry as long as they’re not broken or torn.
Air-Drying
After washing, you need to air dry them for at least 24 hours. Then put them back when they are totally dry. Wet filters are the perfect breeding ground for filters causing the vacuum cleaner to produce a musty smell when in use.
It is highly recommended that you clean the pre-motor filters every month for the optimal performance of your vacuum cleaner.
Read More:
- Master The Art Of How To Vacuum Mattresses And Pillows
- Master How To Vacuum Stairs Efficiently: Quick, Handy Guide!
- Can Robot Vacuums Be Hacked? Discover The Facts!
- Why Is My Robot Vacuum Beeping? Find Out Here!
- Easy Guide On How To Clean And Replace Vacuum Filters
Cleaning The Post-Motor Filter
After cleaning the pre-motor filters, it’s time to clean the post-motor filter. Depending on the model of your Shark vacuum, it can be the HEPA standard.
As you probably know, HEPA filters are high-end filtration systems that are useful for allergy or asthma suffered since it is capable of trapping up to 99.7 percent of allergens, dust, and other small particles.
Most Shark vacuum cleaners usually have one. And like any vacuum filters, HEPA filters also need some cleaning.
1) Locate The Filter
Typically, you can find the HEPA filter located near the vacuum’s motor. However, the location can vary depending on the model so make sure to take a look at your user’s manual.
2) Removing the Filter
Carefully remove the filters and set them aside. Gently tap the filter to remove collected dust and dirt.
3) Washing The Filter
You should wash the filter under running water, rubbing it gently with your fingers in order to get rid of all the dirt and dust out.
Some people use soapy water. However, it is not recommended to use soap or detergent while cleaning these filters since it can affect its functionality over time. Read Here: Shark vs Dyson Vacuum Comparison
Cool running water is the most effective and best method. You’ll know the filter is clean when you see that the water running through the filter is already clear and clean.
4) Air-Drying
After that, carefully tap the filter to remove excess water. Then, allow the filter to air dry. HEPA filters take much longer to dry, and it should take over 24 hours.
It is crucial that the HEPA filters should be completely dry before you put it back into the vacuum cleaner. As mentioned before a wet vacuum filter is the perfect breeding ground for mildew and mold, causing the bad, musty smell when vacuuming.
Read More:
- Master The Art Of How To Vacuum Mattresses And Pillows
- Master How To Vacuum Stairs Efficiently: Quick, Handy Guide!
- Can Robot Vacuums Be Hacked? Discover The Facts!
- Why Is My Robot Vacuum Beeping? Find Out Here!
- Easy Guide On How To Clean And Replace Vacuum Filters
Conclusion
As you can see, cleaning your Shark vacuum filter is quite easy and simple. However, the assortment of Shark models means that the actual process of accessing and removing the filter may be a bit different from one model to another. And this will depend on their designs.
Thus, it is advised that you check your user’s manual so you know exactly where each filter is located and how you can access and remove it.
Once you cleaned all the filters, you’ll notice a change in the vacuum cleaner’s suction power. Because the filters are now clean and free of dirt and dust, the air is circulating freely. In addition, you’ll experience an odorless vacuuming.


